** Affiliate links are used throughout this post at no additional cost to you. This allows me to kee

** Affiliate links are used throughout my blog posts and on the right side of my blog at no additional cost to you. This allows me to keep bringing you content. Thank you all for your support! **

Wednesday, November 6, 2019

Snowman Season Stamp & punch Hack!

When I have to mass produce for Christmas crafts I like to find ways to work quickly since there are SOOO many things to be made. I will sit in front of the supplies I plan to use and try to see where the short cuts can be made. When I received this Snowman Season stamp set and die today from Stampin' UP!


a few thoughts went through my head....I love punches, because the cut out quicker than die and I cannot stand punches that have multiple punches at once because I feel it wastes paper. So after thinking for a moment, I remembered an awesome trick that I use with my dies that I learned from a few crafters out there on the world wide web! It just happened to work with this punch...


This is what I did...
- I punched out a template on a thick piece of cardstock. 
-I placed the template on my stamp platform & lined up the stamps facing down in the holes of the template.
-Then closed the platform to adhere the stamps to the lid.
-Once attached, I removed the template and replaced it with my Neenah paper, inked up the stamps and stamped away!
-Once all stamped out, I then was able to line it up in the punch and punch everything at once. 

VOILA!

***I do not know if someone out there came up with this idea already, but I wanted to share it in case it has not been thought of yet.***

I also just want to point out that I did have to trim a tiny bit of the excess stamp off of the branches in order for them to fit in the template. 

When using the stamp platform with stamps that may not fit in the template all at once....


- line up as many stamps that will fit in the template.
-Stamp them out as many times as needed.
-remove those stamps and replace the template on the platform.
-add the remaining stamps to template.
-Then stamp those out on the sheets that you had the first batch stamped on. 
-They should all be lined up since you used the stamp platform. 


                                          -Now you can punch out the images all at once!!!

(I do not like the ears for any of the images in this set since they punch in a circle, I would fussy cut them instead. I just used them with the bow for the sake of showing the technique.)

I hope this helped someone!

Tuesday, June 11, 2019

Ombre' Overload

Hello! I wanted to make another card for the Your Next Stamp Fun Friday Challenge. I think I went in Ombre' overload on this one. The card base, cupcake/wrapper and monster all have been colored ombre'. I started by blending distress oxides on the card base. Then I die cut a square out of the card base for the cupcake to show through.  I die cut the cupcake with the YNS build a treat die set. Then I colored the cupcake and the wrapper with copics. I die cut the sprinkles on another piece of paper and traced through them with a glue pen. Then I added glitter for a little sparkle. I used a monster from YNS Silly Monsters stamps and dies and colored him with copics. I finished off the card with a little twine and the die cup flower from the treat builder die set. I hope you like it!


Here is a picture of the supplies that I used:


Wednesday, June 5, 2019

Magic Rain Shaker Reindeer Card

Hi! I have been trying out a new (to me) technique called the Magic Rain Shaker Card. I watched it demonstrated by Laura Dovalo and wanted to try it out but I had to tweak her technique just a little to suit my needs. The card that I am going to show you uses Unity Stamp Company's All is Calm all is bright Set and an old Kit of the Month from August 2012. This is a quick video of the card so you can hear the mesmerizing sound the beads make!


The first step to make this card is to stamp the reindeer in Memento Rich Cocoa ink and stamp it on watercolor paper. Then you need to mask the reindeer and spray Ranger Distress Resist Spray on the watercolor paper and let it dry.


This is where I will tweak the technique because I am using a frame for the rain. I have a love hate relationship with foam tape when shaker cards come into the picture. So to do this technique I used my MFT Rectangle Frame die and cut out 6 of them. Then I glued 5 together to give me the thickness I needed for the seed beads to be able to slide easily on the string. I saved the 6th frame for later. 

 Next I will pierce the top and the bottom of the frame at 1/4 inch intervals giving me 7 rows to string beads from. I have a foam mat under the cardstock so I can pierce the holes big enough for the needle and thread to go through.

This is what it looks like with all of the holes. For the beading I used transparent thread and a collapsable needle. (For two reasons, it is thin enough to slide the seed beads through and I can't see! I need the large collapsable eye especially with clear thread!)


The nest step is to put the thread through the first two holes and tie it off. I use double sided tape to help keep it in place because I will be pulling it taut and don't want it to come undone. This was done on the back of the frame.


This picture shows that I have fed the thread/needle through to the front of the frame in the first hole on the left and the beads are on the needle. I only want to use 5 beads each row because I want the effect of the 'Snow" not rain in this case but I do not want it taking over the image.


Once I slid the beads down I lined the threads up with the first hole on the top, put it through and fed it through the next hole. I am a little over cautious with it slipping or coming loose so I did run it through the first and then back through the second hole again. Then I added the beads and ran the thread through the matching hole at the bottom.


I will continue with this process until I am done with all 7 rows. Then I tied the thread off on the back side and to be safe, put double sided tape over all of the holes on the top and the bottom.


This is where that 6th frame comes in. I glued it to the top of the frame with the beads. I do this to keep the beads within the frame so they will not slide on top of the frame when I put the finished frame on the top. 

Now I am going finish the stamping part of the card and put all of the pieces together! I stamped the argyle background from the August 2012 Kit of the Month in VersaMark and on the Kraft cardstock. Next I splattered Picket Fence Distress ink on it with a toothbrush.


While it dries, I blended my night sky background over my reindeer (which is still masked). I used Faded Jeans, Wilted Violet, and Broken China Distress Oxides. I didn't want a dark night sky for this card so I left Black Soot out of the mix. 
You can see the Distress Resist Spray coming through the oxides. So pretty! Next I removed the mask from the reindeer and cut it down to the size of the frame. I also added Gold Wink of Stella to the reindeer to make it glisten with the beads. I added glue to the back of the frame and adhered it to the reindeer piece. 


Next I added the white stitched rectangle scallop frame from MFT.


Now it is time to put all of the pieces together. I stamped the sentiment that also came from the August Kit of the Month with Versafine Onyx Black. I layered that panel on a piece of black cardstock and then on a Kraft card. Last I glued my rain shaker onto the card. 


Here it is! I hope you liked the tutorial!!!


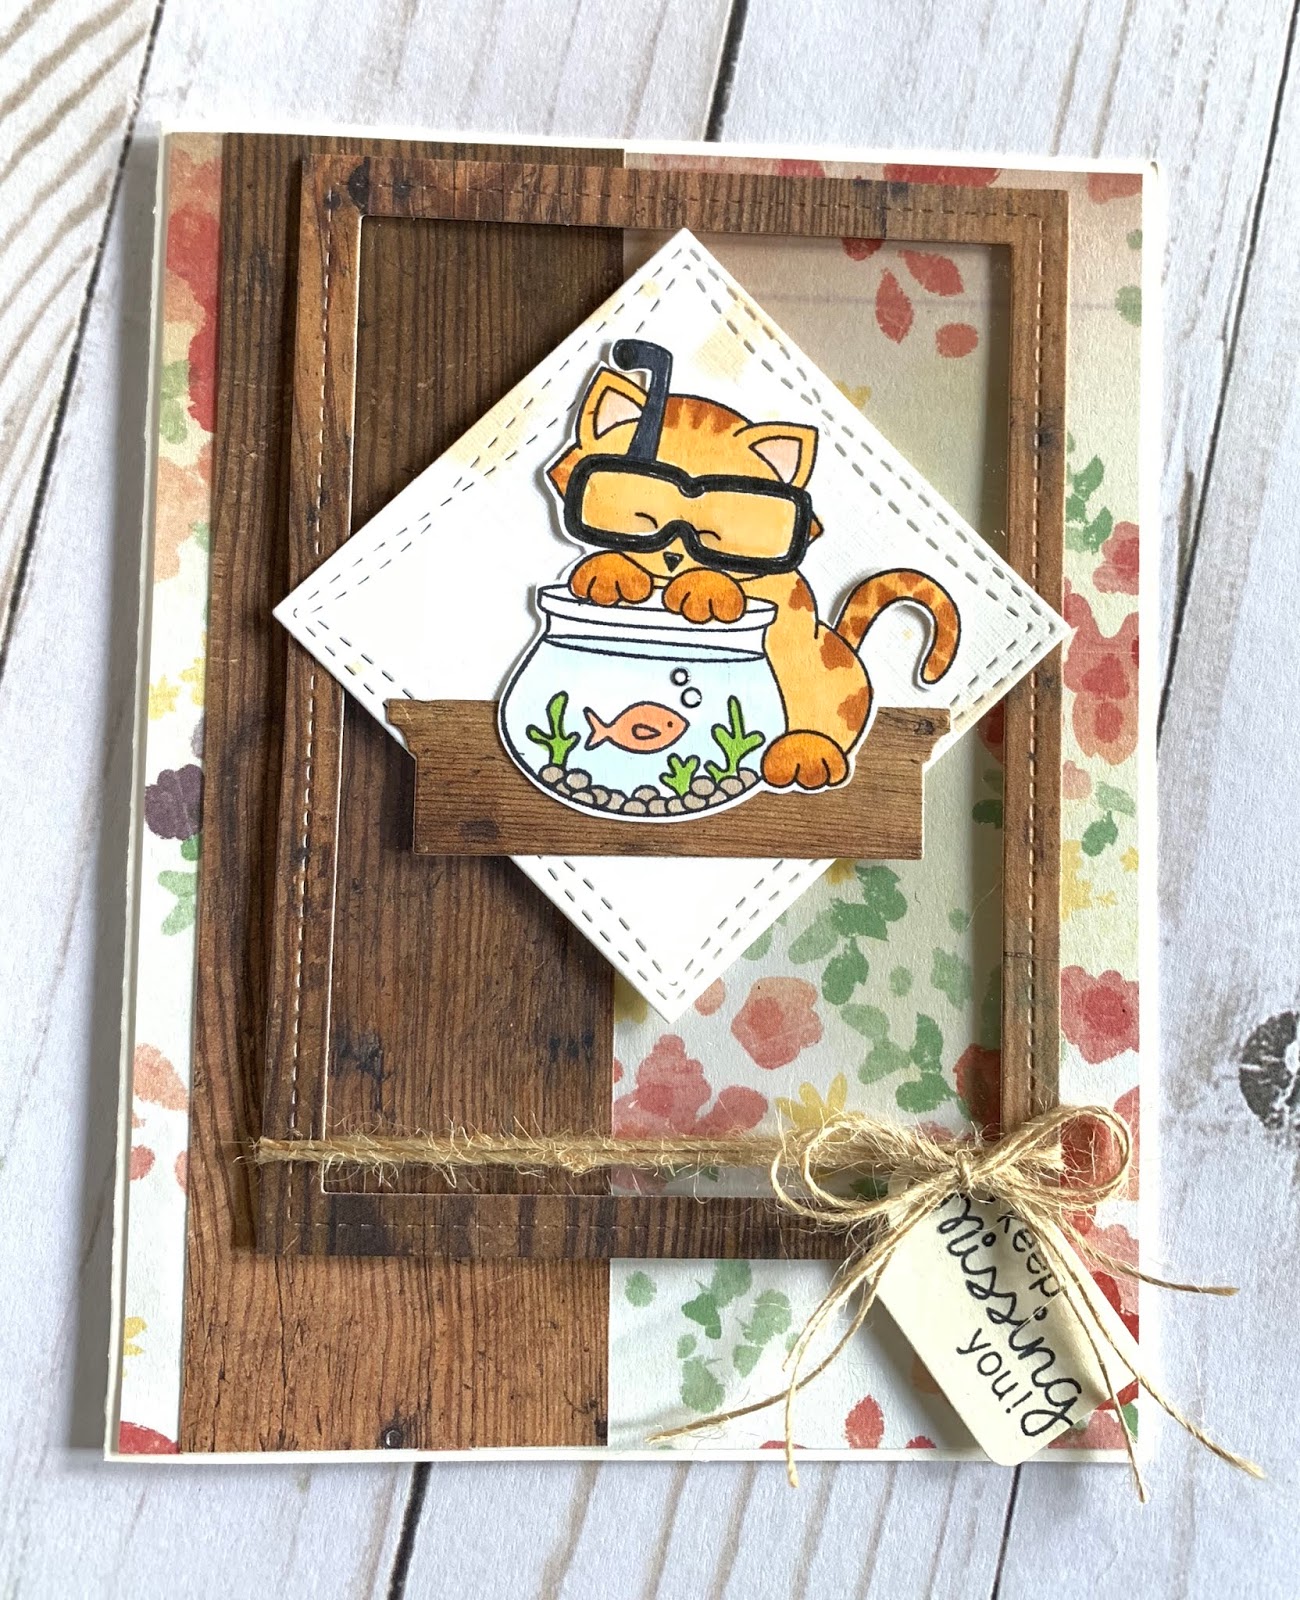
Here are two other cards that I made with this technique:

I used Unity Stamp Company's Rain or Shine Set for the image and Taylored Expressions You Make Me Happy set for the sentiment for this card.


I used Newton's Nook Newton's Summer Vacation set for this card. I made it for their current Inky Paws Challenge. You were to use the colors of the rainbow in your card.

Thank you for stopping by! Check out my Instagram, there are so many more cards that I have made on there.


Friday, May 31, 2019

Missing You Inky Paws Challenge

This card is one of my entries into the Newton's Nook Inky Paw Challenge #98 Sketch Challenge. 


I love how cute this cat looks with the fish tank. 


I used the Newton's Nook Newton's Summer vacation and the "I keep Missing You" Sentiment is from the Newton's Birthday Flutter Set. I also used acetate for the window and CTMH Liquid Glass for Newton's goggles and the two bubbles in the tank. The Copics that I used are below:


Friday, April 26, 2019

Three for Unity!

Today is a big one! I made two cards and a canvas panel. I was pretty busy today but managed to fit in the time to play with my stamps. It was very therapeutic! 


This first project is a canvas panel using Unity stamp Company Cuddlebug Sea Horse and distress oxide inks. I added a Mica Spray to the sea horses to add some shine. I LOVE this set! 


These are my supplies:


The second project was this card using Unity Stamp Company's 'Who you really are' Stamp set and Distress Oxides. I smooshes the oxides on my mat with glossy cardstock. I really like the color combo!


These are the supplies that I used for this card:


My final card today is using a sentiment from 'Delight in Beauty' also by Unity Stamp Company. I love butterflies and this sentiment is truly inspirational for many of us as we change throughout our lives!!!


These are the supplies for this card:


So that is it! My creations to share with you! Hope I was able inspire someone! 


Tuesday, April 23, 2019

Easter Shaker made by my daughter!

My daughter was in a crafting mood Saturday and I was excited when she said that she wanted to make a card. She is very creative and I wish she would make cards more often. I love how her card turned out! 

She used Amuse Studio Sweet Easter stamps and Taylored expressions Sun Stencil. The sentiment "Happy Easter" was also from Taylored expressions


CAS Fun Friday Challenge Coffee and Unicorns!

So I am still trying to catch up with the cards that I have made over the past few days. I made these two cards for the Your Next Stamp Fun Friday Challenge #112 Clean and Simple .

The first card actually smells like coffee. I do not have a coffee background stamp so I used a cup and some cold coffee to make the rings. I also used Your Next Stamp's Ellie loves lattes set and my Prima watercolors to color her in. My daughter started working at Starbuck's coffee so I tried to make the cup resemble Starbuck's even though I am a die hard Dunkin' drinker!


And this is my coffee mess... 


Unicorn Kindness:

I used Winter Unicorns Rock from Your Next Stamp and Heartfelt Sentiments to make this card.


These are the supplies. I forgot to add the Oxides to the picture for the stencil.


Hope you like them!