** Affiliate links are used throughout this post at no additional cost to you. This allows me to kee

** Affiliate links are used throughout my blog posts and on the right side of my blog at no additional cost to you. This allows me to keep bringing you content. Thank you all for your support! **

Friday, January 7, 2022

Key To My Heart {Maker Forte}

 Hello crafty friends! I will be sharing a couple of masculine Valentine cards today. I used one of the new stamp releases called “Under Lock and Key".

I love this stamp set. It is fabulous for masculine or vintage cards. Do you ever get stuck making masculine anniversary or birthday cards? Valentine’s Day you can get away with reds and pinks, but if you are looking for a more vintage card, this tutorial will help you out.

I began by smooshing Frayed Burlap Distress ink on my glass mat. I spritzed it and the watercolor paper with water. 

Next, I smooshed the cardstock into the ink. I dried it completely with my heat gun and did the same thing with Speckled Egg Distress ink, drying it well after smooshing. ( The picture shows Antique Linen, but I skipped that color.)

Then, using my Misti Stamp Platform and Smoosher Tool, I stamped the Under Lock and Key stamp on the cardstock using the new Flat White Color Hive ink

As you can see, I do not have my cardstock against the side. I used Sticky Grid sheets to keep the cardstock in place. This is a time when using a Misti is really important. After I stamped the image with the Flat White Color Hive ink, I cleaned the stamp and stamped it again with Clear Embossing Color Hive ink. Then, I embossed it using clear embossing powder.

Once I embossed the panel, I blended Flat White ink around the outer edges to darken it a little. Then, using layered heart dies from my stash, I cut the heart out of the panel. Because I wanted to have the “Key to My Heart” theme to my card, I made sure I lined it up so the word ‘Key’ was in the top of the heart. Then, I cut out Eclipse Black cardstock using the next size up in the layered heart die. 

I adhered the panels to card bases using Eclipse Black cardstock and I also adhered the layered hearts. Then, I added foam tape to the back of the hearts. I stamped the sentiment “All my Love” from the “Grateful To You” stamp set on a strip of cardstock that was extra from ink smooshing. Next, I punched a hole in one end of the sentiment and cut a flag in the other. Using twine from my stash, I made a bow and attached it to a key charm and the sentiment. To finish off the card, I adhered the bow and trinkets to the card panel. One of the cards, I added a few enamel dots to the bottom as well.

I hope you enjoyed my tutorial today! Thank you for stopping by and I will see you next time! 

Kimberly

Wednesday, December 29, 2021

Seasons Greetings {Maker Forte}

 Hello crafty friends! I would like to share with you how to use this beautiful Winter Deer stencil with your foil! 

I absolutely LOVE this stencil. I know I will be using it for many cards and some will not be winter cards. While I really love the snowflakes on this stencil, I didn’t want to use them on this card and I am sure I will make cards in the spring that I only want to use the deer head without the snow flakes too. I could use purple tape to cover the flakes, but I didn’t want to have to do that each time I wanted to omit the flakes. I wanted something I could use with pastes, be able to clean and reuse. So I covered the stencil with one of my plastic stamp storage pockets and loosely traced the deer with a black marker.

Next, I cut the inside of the black line out and cleaned off the marker with alcohol. Then, I sprayed the plastic sheet I cut out with Pixie spray so it would not shift on the stencil. 

To start the card, I blended Pumice Distress Oxide ink over the Onward and Upward stencilon an Ultra White panel. I used the deer silhouette from the stencil to leave the deer white on the panel.

Once I finished blending the Pumice Stone ink, I removed the stencil and lined up the Winter Deer stencil with the plastic sheet I made over the ink blended panel. If you look real close you can see that plastic sheet covering my stencil.

I applied Transfer Gel Duo over the stencil. When I removed the stencil, I put the stencil and the plastic sheet in a bucket of sudsy water. Then, I put the panel off to the side to dry. Tip**It is a good idea to use the Pixie Spray on the deer when you are going to use the transfer gel because if it seeps under the stencil, foil will stick to the spot that leaked distorting the image.**

When the transfer gel was completely dry, I put Sunrise Lake foil (shiny side up) over the gel and ran it through my Minc machine. I stamped the sentiment from Modern Christmas Sentiments in the bottom corner. To finish the card, I added a couple of holly leaves from my stash. Then some Solar Flair and Rollerskate Crown Jewel Gems for a finishing touch. Finally, I layered the card panel on a Cappuccino card base.

Thank you so much for stopping by! I hope I was able to show you another way to mask off parts of your stencils!

Kimberly

Friday, December 17, 2021

Have a Rawr-some Holiday! {Maker Forte}

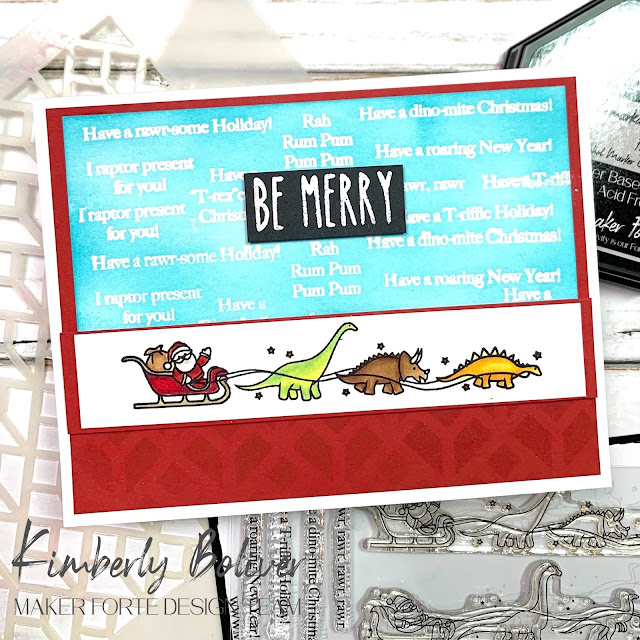
Hello! I have a card to share with you today that is Dino-Mite! For this card, I used the new T-rrific Holiday stamp set and the Onward and Upward Stencil. I also added a sentiment from the Build a Modern Christmas stamp set


 I started out by lining all of the sentiments up on my Misti to fit on a 3 3/4" x 4" piece of Ultra White cardstock. I stamped them with Color Hive Clear Embossing ink and embossed it with white embossing powder.


After I embossed the sentiments, I moved the cardstock up in my Misti to get a second group of sentiments on the panel. 


After I had that embossed, I blended Blue Raspberry Color Hive ink over the embossed sentiments and the Ultra White cardstock. Then, I rubbed the ink off of the embossed words so they would remain white.


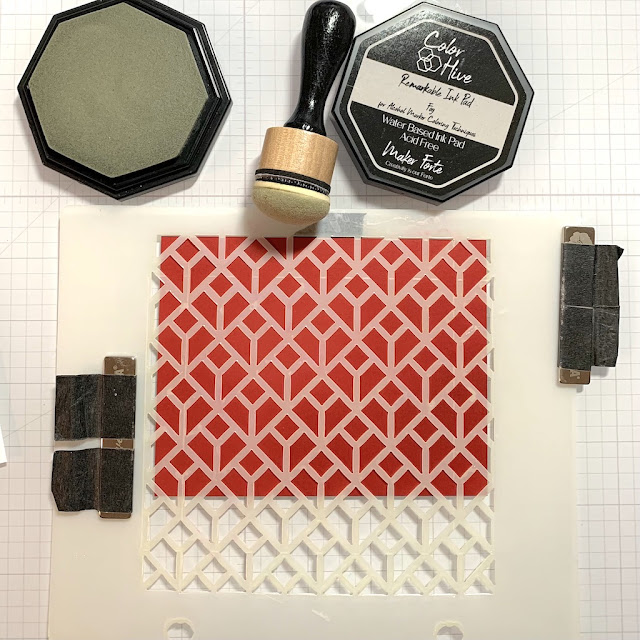
After I had that embossed, I blended Fog Color Hive ink over the Onward and Upward stencil on Telephone Box cardstock


Next, I cut a strip if ultra white cardstock to stamp the dinosaur image on and a strip of Telephone Box cardstock for a layer behind it. I also embossed the "Be Merry" sentiment on Eclipse Black cardstock.


I assembled the card and then colored the dinosaurs and Santa with my Copic Markers.

Once I had everything colored, I added it to the card. This was a pretty easy card to make and I just love that Dinosaur sled. This is such a cute set!! Thank you for stopping by!

Kimberly


Friday, December 10, 2021

A Sweet Thank you! {Brutus Monroe}

 Well, hello! I have my second post for the month sharing the Brutus Monroe December Inspiration Box, "Sugar and Spice"! 


This card was a very easy projects For the main panel, I randomly stamped the coffee cup and the sentiment "Hey Sugar" all over the background. I colored them I with Copics and cut down the panel with a rectangular die in my stash. Next, I stamped a bunch of the flowers from the"Sugar and Spice" stamp set and die cut them with the matching dies. I colored them with Copic markers and popped random flowers up on the coffee cups with foam dots. I adhered some directly to the cups with glue. 


Next, I stamped, die cut and colored the cake image from the set. The embossing powder that comes with this months inspiration box is very pretty. I wanted to use it for the dripping icing. So I colored in the icing with and embossing pen and sprinkled the powder on to heat emboss it. I love the glittery shine it has!

To finish the card, I adhered the cake to a velum square doily I cut from my stash and added foam dots to pop it off the stamped panel. I attached a sentiment from the conversation clippings in the kit. Then, I added foam tape to the stamped panel and attached it to the card base I cut from cardstock that came in the inspiration box


Thank you for stopping by! be sure to check back next Friday for more inspiration from the Sugar and Spice inspiration box! Have a great weekend!

Kimberly

Wednesday, December 8, 2021

Love with Layers! {The Hedgehog Hollow}

 Wow, I cannot get enough of the December Hedgehog Hollow subscription box. Everything in it is amazing! I would like to share this card with you that I made using the beautiful stencils in the box!


I started out by blending Black Soot Distress Oxide ink over the word "Love" from the "Love and Home" stencil. These Bitty Bunny blender brushes are perfect for little spaces! Then, I embossed it with clear embossing powder.


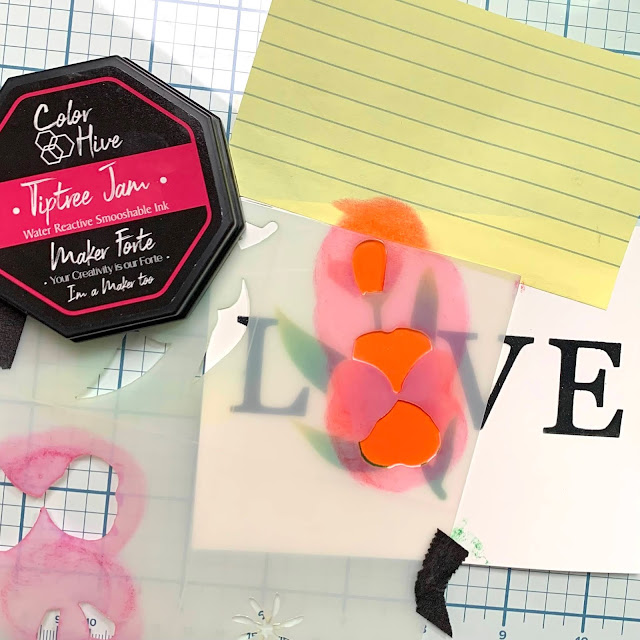
Next, I used the layered "Evening Primrose" stencil to fill in where the 'O' would be in love. To make sure I line up each layer of the flower correctly, I placed the leaves where I wanted them to be and lightly marked where the corner and side were with a pencil. (Don't forget to erase the pencil marks later!)


I blended Hyde Park Color Hive ink over the leaves. Then, I blended a little Everglades Color Hive ink over it to give some dimension. Next, I turned the stencil once and lined it up on the pencil marks. I blended Coral Keys Color Hive ink through the stencil and a little Tiptree Jam Color Hive ink.


Then, I turned the stencil to the other set of petals and did the same thing. I used the post-it note to make sure I didn't get ink on the card panel.


To finish the flower, I turned the stencil to the flower center lining it up with the pencil marks and blended Mustard Seed Distress Oxide ink over the flower center. I trimmed down the panel to 3 1/4" x 5". Then I layered it on a gold panel. To prepare the ultra white card base, I used the "tangled ropes" stencil from the box and blended Pumice Stone Distress Oxide over it.


To finish the card, I added foam tape to the top panel and adhered it to the card base. Then, I added Solar Flair Crown Gem Jewels to the center of the flower and a few scattered. Thank you so much for stopping by! I hope you are enjoying this month's Subscription box as much as I am!!!

Kimberly


Tuesday, December 7, 2021

If You Listen Carefully... {The Hedgehog Hollow}

 This time of year can get so busy. Whether you waited too long to start your cards or forgot to make a few, "Clean and Simple" is what you need! I am going to show you how to make this set of three cards super easy and super quick using the December Hedgehog Hollow Subscription Box.  


I am so in love with this new subscription box! It has winter and spring images and a ton of beautiful sentiments to go with it. I cannot wait to use the stencils next! To start, I stamped the square pine sprig image with Color Hive Clear Embossing ink, using my Misti on watercolor paper. I love using the perfect first impression tool to get a great image every time.


You can use ultra white cardstock. I had intentions of doing a light watercolor, but just loved them after embossing them. So I left them just the way they were.


After I embossed the three panels, I die cut them with a rectangular die from my stash. They measure 3 3/4" x 5" Next, I cut down some gold cardstock to 3 7/8" x 5 1/8". Then, I embossed the sentiments in the center of the squares.


I adhered the embossed panels to the gold panels and added foam tape to pop them up on the card bases. To finish off these CAS cards, I added some Solar Flair Crown Jewel Gems.


Thank you so much for Stopping by!

Kimberly


Friday, December 3, 2021

Live Life with a little Spice! {Brutus Monroe}

 Happy Friday! I am back to share the new Brutus Monroe Inspiration Box for December!! This kit called "Sugar and Spice" is awesome for anyone that loves to be in the kitchen! 


I really think the embossing powder in this kit is so fun! It is like sparkling mustard! So to begin, I made the yellow panel, by rubbing embossing ink through the basket weave stencil (tilted so the lines would be straight across instead of diagonal). Then, I poured the embossing powder over the ink and heated it. 


this is what it looks like:


I put that to the side and worked on the images. I stamped, die cut and colored the salt, pepper and paprika spice bottles. Then, stamped the silverware and colored them.


I used a hobby knife to slice a straight line across the top of the pocket so I could slide the silverware into the pocket.


Then, I assembled the card! I cut a card base from the red cardstock in the kit. I cut down a piece of patterned paper (also in the kit) and layered it on the red card base. I popped the yellow embossed panel up on foam tape and adhered it to the patterned paper. Then I finished off the card adding the images and one of the conversation clippings from the kit. 

Thank you for stopping by. I hope you enjoyed my card today! Come back next Friday to see more inspiration from the Sugar and Spice inspiration box!

Kimberly

Tuesday, November 30, 2021

My Heart is Filled with Gratitude {Varada Sharma}

Have you ever make a card where everything you planned went wrong? Well, this is one of them for me! I was determined to make it work because I had colored it before checking to see if I sized the images correctly for my slimline die. So after many changes, I finished it as an A2 size card and I am so happy with the results!


I started by layering the deer from "Oh Deer" behind the "Mini Slimline Pumpkin Patch" image. Then I added a sentiment from the "Gather Here" kit. I printed the image on XPress-It cardstock. Then, I colored the images with Copics.


I went to die cut it with the slimline die and realized it was not the right size for the die. So I die cut it with  a smaller rectangle die.


As you can see, part of the sentiment was not cut off. So my next plan was to print the flower image from "Gather Here". I colored and fussy cut the image. Then I put it to the side. I printed the wood slice image from "Gather Here" on Kraft cardstock and cut it down to 5 1/2"x 4 1/4". Then I blended Gathered Twigs Distress Oxide around the edge.


Next, I used a rectangle die to cut out part of the wood slice image. I adhered the outside frame to a card base. Then I added foam tape to the center wood slice panel. I adhered the pumpkin patch panel on the wood slice panel. Then attached it to the card base with the foam tape. This is where my next issue arose. I accidentally got too close to the card base with the foam tape and it was not centered properly before it became attached. YIKES! So....to fix that, I decided to tie twine around the panel.


Once I had the twine tied, I added the floral image that I colored earlier on the top corner to cover what was left of the sentiment that wasn't cut off from the die. To finish the card, I printed a sentiment from the "Words of Thanks" kit on black cardstock and foiled it with gold foil. I cut it down to size and attached it to the card.

I am so happy that I didn't discard the image once I realized my original plan wasn't going to work. It was really fun to find ways to make it work and I love the outcome. 

Copics used:

Bird: R39, R29, R27, R24, E40, E41, E43 YR23 Deer: E30, E31, W0, W1, W3 Antlers: E57, E37

Pumpkins: Y38, Y36, y21, YR68, YR23 Stem: E59, E57, E35 Leaves:YG17, YG13 

Acorn: E57, E37, E31 tops E59, E37

Thank you so much for stopping by!

Kimberly