** Affiliate links are used throughout this post at no additional cost to you. This allows me to kee

** Affiliate links are used throughout my blog posts and on the right side of my blog at no additional cost to you. This allows me to keep bringing you content. Thank you all for your support! **

Saturday, September 25, 2021

Life is better with sprinkles {The Hedgehog Hollow}

Hello crafty friends! I have a couple of cute mini slimline cupcake cards to share with you today!  This month, The Hedgehog Hollow inspiration box was all about sweet treats! So many amazing products were included! I have a short video below!


To make these cards, I stamped the sentiment on ultra white cardstock panels that measured 3 1/4" x 6 1/4" using Eclipse Black ink. Then I layered these panels on Tiptree Jam and Welsh Dragon cardstock from Maker Forte that measured 3 1/2" x 6 1/2". Next, I adhered that to an Ultra White card base measuring 6 1/2" x 7" scored in the center at 3 1/2". 

Then I stamped the cupcakes and fussy cut them. I embossed the sentiment on strips of eclipse black cardstock with white embossing powder. To finish the cards, I colored in the cupcakes, popped them up on foam tape and adhered them to the card. Added the embossed sentiment and a few Tartan Teal Crown Jewel Gems to the Welsh Dragon Card and Aura Crown Jewel Gems to the Tip Tree Jam card. 


Copics:

Teal Wrapper: BG11, BG10, BG13, BG23, BG34

Pink wrapper: RV13, RV14, RV17, RV19

Icing: E40, E41, E42, E0000

Thank you for stopping by! 

Kimberly

Friday, September 24, 2021

Birthday Unicorn {Brutus Monroe}

 Hello! I have a super easy full front shaker card for you today using Brutus Monroe's Unique Unicorn Inspiration box


To make this card, I stamped images from the Unique Unicorn stamp set around a white piece of cardstock. Then I stamped the rainbow image and die cut it with the matching dies in the kit. 


I colored the rainbow and glued it to the white card panel. Then, I slid the white stamped panel into a self seal clear bag that measures 5 7/16" x 7 1/4" and added the sequins from the kit. (this kind of card is a great way to use up sequins if you have a lot in your stash)

I sealed the bag on the back and added two sided tape over the back to adhere the shaker to a piece of printed paper that was included in the box. I cut the printed paper to 5 5/8" x 4 3/8" so I could have a border around the shaker card. Next time I am going to use a smaller seal bag when I want to make a regular A2 card AND have a border around it. These seal bags are perfect if you aren't going to have a border. 

To finish the card, I added a sentiment from the conversation clippings that are included in the box and attached it to a card base. Super easy! 


Thank you so much for stopping by!

Kimberly

Growing in Unity {Day 5}

I have had so much fun this week with all of you! As all good things must come to an end, today is day 5 and my final post for GIU. I had so much fun creating the projects that I shared this week and it was so fun to get to know more about you in your responses to my posts. Thank you so much for sharing my week with me!


For today, I am sharing a few cards that I made using another one of my favorite Kit of the Months,"Lucky to Have You" 2/12 KOM. This one goes way back... but I have used these images from the kit many times over the years. I love the vintage look and that clock image is my all time favorite. 


For the first card, I blended Antique Linen distress oxide, Antique Linen distress ink {not oxide}, and Gathered Twigs distress Oxide over Newton's Nook Argyle Stencil. Then I heat embossed the clock image using Walnut Stain Distress Embossing Glaze. I really love how it turned out so you could imagine my utter sadness when I stamped the two vintage cars and realized the one on the right was not even close to straight. (why it is always good to check that on scrap paper first!) 


But, you know what....there are no mistakes in art, only embellishment opportunities! So I decided to get creative with the sentiment to try and hide this little bump in the road. Once, I adhered the sentiment, I decided I wanted to add some ink splotches to the card. I didn't want the sentiment to have splotches, so I covered them with Washi tape. To make the splotches, I smooshed Gathered Twigs distress ink on a stamp block and sprayed it with water. Then with a paint brush, I flicked the ink onto the card.


I attached it to brown cardstock with a white core that I distressed for an old look. and removed the Washi tape from the sentiment.


The next card was a fairly easy slimline. I smooshed Antique Linen distress oxide on watercolor paper and blended Gathered Twigs distress oxide around the edge.


I stamped the vintage car images spaced evenly (and straight) down the middle of the panel. Then attached it to brown cardstock that I distressed. Next, I stamped the sentiment, cut it in three and layered it on a strip of black cardstock. To finish this card, I popped the sentiment on foam tape and added it to the card front.


My last card, is also a slimline. I had to get creative with this one too. I ran out of the brown cardstock I used on the other two cards, so I needed to piece together the left over pieces to fit my slimline. I lined up the three pieces on the card base and distressed them. Then, to cover the two lines where the pieces connected, I added thin strips of black cardstock that I also distressed. Voila! You would never know that was not one long piece of brown cardstock! 


I blended Antique Linen distress oxide over the white panel and stamped the two sentiments down the whole panel. Next, I blended some Gathered Twigs distress oxide over a piece of vellum and stamped one of the vintage cars on it. I folded the edge of the vellum over the top and bottom of the white panel and adhered it on the back so you didn't see the glue. I also put a little glue behind the car image and at the bottom, under the big black enamel dot. To finish this card, I added twine and foam tape before adhering it to the card base. 


And I would be remiss if I neglected to mention that I finish off my cards with this awesome stamp from Nic! This is a fairly new stamp as we recently moved and I needed an updated stamp. Magnuson Custom Stamps made it exactly how I wanted it! 


Masculine cards are always hard for me to make. I feel like I tend to purchase more feminine or children oriented stamps. Do you have a type of card that is hard for you to make? Thank you again for stopping by this week. I really enjoyed sharing with you all!!!

Kimberly


Thursday, September 23, 2021

Growing in Unity {Day 4}

I  cannot believe how fast this week is going. I am having so much fun sharing my Unity Stamp Company creations with all of you. For day 4, I would like to share these two cards featuring the "Spark" stamp set and a sentiment from the "Timing is Perfect"stamp set

Generally when I make ink smooshed backgrounds, I do not photograph them. I sometimes make them to use up ink on my glass mat. Sometimes, I am just playing and save them for a later time. I made these backgrounds specifically for these cards, but unfortunately, I did not take a picture of the process and it is real hard to replicate an ink smooshed background. 

If you have not tried ink smooshing, it is really fun, but it is really important to heat set the ink before switching to another color. Otherwise, you will just get mud. Once my backgrounds were dry, I added more ink with stencils. 

These were both made on watercolor paper. For the teal card, I used Peacock Feathers, Twisted Citron, and Mustard Seed distress ink. I also used the Mini Microbial stencil and Mini Moving Vines stencil from The Crafters Workshop. I blended Pumice Stone distress ink over the Mini Microbial stencil in various places on the background.


For the pink card, I used Picked Raspberry, Mustard Seed and Twisted Citron distress ink. I blended Ground Espresso distress ink over the Mini Specimens stencil and Pumice Stone distress oxide over the Mini Microbial stencil. 

To finish the background panel, I stamped the sentiments on them and die cut them using the Gina Marie Designs Labels 6 Cloud Like Edge Nested Die Set. I had some grey white core cardstock in my stash that I distressed with a sanding block and added the ink panel to. 

I stamped and fussy cut the images from the Spark set. Then, I colored them with Copic Markers. I popped them up on foam tape and adhered them to the cards. I hope you like these cards as much as I enjoyed making them! 

Thank you for stopping by! Do you have a favorite technique to use when making cards? 

Copics:

Teal Butterfly
BG10, BG11, BG13, BG23, YG01, YG21

Pink Butterfly
R20, R30, Y00, YR31

Caterpillar
Y00, YG01, YG21, R20, R30

Branch/leaves
E34, E35, E37, G20, YG01, YG21

Kimberly

Wednesday, September 22, 2021

Growing in Unity {Day 3}

Wow! This week is going so fast! As I mentioned in my Bio, the beach is my love language. So I thought it would be fun to share my favorite Kit of the Month. KOM 5/18 "Open Sky, Deep Ocean" is definitely my favorite kit from Unity stamp Company. I love every single image and every sentiment in this kit. 


The mermaid image in this kit is perfect for a slimline card. I decided to make it "kind of" a faux shaker slimline card. I love the look of shaker cards, but when you stand them up, all the shaker elements fall to the bottom. Sometimes they get stuck on top of each other and won't move. Sometimes, it is hard to determine the right amount of shaker elements to put in the card. I chose to glue many of the sequins to the panel and left only a few at the bottom so it would still shake, but have the sequins nicely placed when standing up.

I started this card the same way as the cards I made yesterday. I stamped on watercolor paper, X-Press It paper and this time I also stamped a mask.


I put the mask over the watercolor paper image and heat embossed the seaweed image over it using white embossing powder.


I carefully peeled the mask off and used my distress inks to paint in the seaweed and the water.


I do not like wasting the ink on my glass mat (I always seem to put too much) so I will usually start a smooshed background on another watercolor paper. This time I decided to use it to add more dimension to the water on this panel.


Next, I heat embossed the sentiment on heat resistant acetate. 


I cut out a frame using watercolor paper and a combo of two dies that held together with washi tape while die cutting. 


Next, I glued the acetate to the frame using strong double sided tape. I added a double thick foam tape and set it to the side while I colored the mermaid and seahorse. Once I colored the image, I used foam dots to pop up the mermaid, lining it up on the watercolor panel. I used my Wink of Stella glitter brush to add a sparkle to the mermaid. Then, I adhered the sequins to the mermaid panel and left a few loose. Once the glue dried, I attached the frame with the acetate. To finish the card, I added the seahorse image and used my Wink of Stella to add a little more sparkle. 


Copic colors:

Mermaid
Hair: E31, E25  Skin: E0000, E000, E00  Necklace: R85
Tail: BG000, BG10, BG11, BG13, BG34 V01, V04, YG01, YG23

Seahorse: YR68, YR65, Y38, Y13, Y15, Y18
Flowers: YR31, R85, R81 Grass: YG01, YG23

Thank you for stopping by! Do you have a favorite Kit of the Month? 
Kimberly


Tuesday, September 21, 2021

Hello and Thanks with Alcohol Inks {The Rabbit Hole Designs}

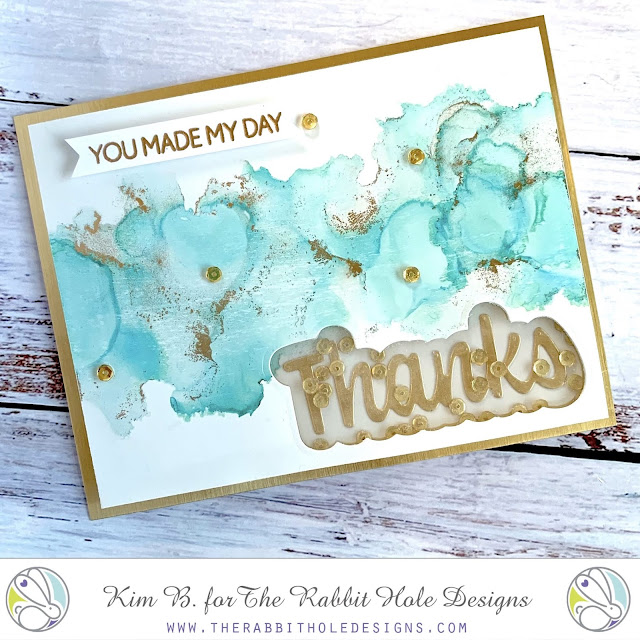
Hello! I have a couple of cards to share with you today using alcohol inks and the new word dies from The Rabbit Hole Designs. The alcohol ink background on the first card was made by me. The gorgeous background on the second card was made by Niccole and gifted to me to create with. I was inspired by her background to give alcohol inks a try again, but my backgrounds always look like a tractor trailer ran over a rainbow. Well, I refuse to give up!

I used Brea Reese alcohol inks and acetate for my first card. My Yupo paper was in storage from our move so the acetate was a fine replacement. 

I wanted the background white, so I adhered the alcohol panel directly to the white card base. Next, I cut out "Hello" using the new Hello-Scripty Dies from brushed gold cardstock. I adhered that to the alcohol panel. Then, I heat embossed the word "Friend" from the matching Hello-Scripty stamp set using the new Cottontail Embossing Powder Tool and gold embossing powder on a strip of black cardstock. I added foam tape t it and popped it up on the panel. To finish this card, I added some gold glitter enamel dots from my stash. 

This next card features the background gifted to me by Niccole.


I used the shadow part of the Thanks- Scripty die to cut a part of the panel so I could make a shaker card. Next, I lined up the shadow part that I cut out and adhered it to a gold base so it would show through the shaker. I die cut the word "Thanks" from gold cardstock and adhered it to the "Thanks" shadow. I glued acetate to the alcohol ink panel and added some sequins over the word "Thanks" before attaching the alcohol ink panel with foam tape. I embossed the sentiment from the matching Thanks-Scripty stamp set using gold embossing powder and the Cottontail Embossing Powder tool on a strip of white cardstock. To finish this card, I popped the sentiment up on foam tape and glued a few sequins to the card front.

Thank you for stopping by!
Kimberly


Growing in Unity {Day 2}

Welcome to day 2 of Growing in Unity! I know most if not all of us have been impacted by someone in our family, friend group or even ourselves by cancer. For me, I have a Grandmother, Mother, Aunt, Mother-In-Law and a few friends who have all had or have breast cancer. Today's post is dedicated to them and to remind all of you (public service announcement) to make sure you get to your annual appointment. Next month is dedicated to remind people to get their checkup, but I thought I would get a head start....Get those TA~TAs checked!!!!


Not only do I love that Unity Stamp Company has so many amazing images, I have fallen in love with their sentiments. They are perfect for so many circumstances. My first two cards we made with many of the same steps so I am going to talk about them together.


I really love the little dots and doodles that usually accompany Angie Girls and some of the Fashionistas. My problem in the past was, when I would fussy cut the image out, do I keep the dots or do I cut them out. So what I did to solve the problem was, I would stamp the image on the panel I was going to adhere the fussy cut image to and then just omit the doodles and dots when I fussy cut it. That way I can keep them but cut close to the image. Here I used Karen Girl and Hope {Fashionista}. The Sentiments are from Here Today, Here Tomorrow and If It Weren't For Cancer.


I knew I wanted the cards all to match so I really didn't need to use watercolor paper for these two, but I used it for the third so I kept it consistent. I started out by stamping the image and sentiment on the main panel using watercolor cardstock and the image I was going to color on X-Press It cardstock. I have been told that if you use Copics on watercolor paper, it will just absorb the color into the paper and use up your ink quicker. That is why I generally use Neenah and X-Press It cardstock when coloring with Copics. 

Next, I blended Catherine Pooler "It's a Girl" ink on part of the panel for the Karen Girl card. Then, I put the stencil down and used the same ink to blend over it. You can see when I took the stencil off, that the stencil got on the image, but it doesn't matter because it will get covered up. (I like that it eliminates the step of masking the image)

I colored both images that I stamped on X-Press It cardstock with my Copics and fussy cut them out. I used foam tape on Karen Girl to pop her up on the card panel. I glued the Fashionista directly to the main panel. Both of these cards are mini slimline cards so, I cut the watercolor down to 6" x 3 1/4". The Karen Girl panel was then attached to a 6 1/2" x 3 1/2" piece of pink cardstock. Next, I planned how to add my sentiment to the Fashionista card. 

There are a couple of things I want to mention about vellum.  My first suggestion is, sometimes we have sentiments that are big and they will cover all the coloring we just did. I like to stamp the sentiment on vellum so you can still see the image under the sentiment. Which brings me to my second suggestion. I know we are always trying to find creative ways to attach vellum to cards without the adhesive showing. My tip here with the Fashionista card is, fold one side over (in this case the left side) behind the cardstock and glue it in the back. Then, on the front, I use clear glue and put a very tiny dot behind a couple of the letters from the sentiment before pressing it down. When it dries, you cannot see it. 

After I attached the sentiment, I added foam tape and attached the panel to a 6 1/2" x 3 1/2" piece of pink cardstock. To finish both cards, I attached them to a white 6 1/2" x 7" card base scored in half at 3 1/2" and added some bling.


For this card, I used the All Things Are Possible set. I started out by ink smooshing the "It's a Girl" ink on a panel of watercolor paper. After I dried it completely, I blended the the same ink over the stencil and cleaned the ink off the stencil. Then I lined it back up on the panel and spread Glossy texture paste over the stencil in some areas. I put that off to the side to dry and cleaned the paste from the stencil so it wouldn't dry on it. 

Next, I stamped the butterfly on X-Press It cardstock and colored it with copics. Because I only colored the outside of the butterfly with Copics, I wanted to add something to the inside. I stamped a mask of the butterfly and cut out the inside part of the butterfly.


Next, I lined up the mask over my colored butterfly, put the stencil over it and blended ink through the open part of the butterfly. 


That gave me cute little dots inside my wings. 


To finish up this card, I die cut the watercolor panel as well as the center of the panel. I added foam tape to pop it up on grey card base. Then, I popped the butterfly up on foam tape and stamped the sentiment on a strip of watercolor paper. I attached them to the card and added some bling. 

Copics used:

Karen Girl
Hair: E31, E25, E29
Skin: E000, E00
Top: R81, R83, R95
Pants: W00, W1
Shoes: T0, T2, T6

Hope {Fashionista}
Wrap and top: R81, R83, R85
Sweater and boots: W0, W1, W2, W4
Pants: T0, T2 
Skin: E000, E00

Butterfly: R81, R83, R85

Thank you so much for stopping by! I hope I might have given you a couple of tips that you can use!
Kimberly

Monday, September 20, 2021

Growing in Unity {Day 1}

 Hello crafty friends! I am so super excited to be the Growing in Unity girl this week! I have been looking forward to sharing my love for Unity Stamp Company! I have been collecting Unity Stamps for over 12 years. I have to admit, while I sat in front of my Unity collection, I did have a hard time deciding which stamps were going to get used in my projects for this week as I love them all. It is kind of like trying to pick your favorite child {My kids do not believe me, but they are all my favorite}!

I decided that I was going to start out the week with my first stamp set from Unity. When I purchased the Cuter Than Most stamp set 12 years ago, it came in a brown organza bag. Over the years, I built up my stash and truth be told, red rubber is my favorite. It just stamps the best in my humble opinion. So let me share my project for today using the Cuter than Most stamp set.


I made a shaker mini slimline card and three Halloween treat bags with the monsters on the tags . These little monsters are just so stinking adorable and so fun to color. 


This shaker card was super easy to make. I blended Pumice Stone distress ink over a spiderweb stencil on grey cardstock. Then, I die cut a square out of it and added acetate behind the cardstock to cover the square. I stamped the sentiment on the white card base and adhered my first little monster that I stamped, colored and fussy cut. I did want to add, when I colored in this little monster, I drew spots on him using a 0.5 black Copic Multiliner. 

Then, I sprinkled a little bit of black sequins over him for the shaker element. Next, I wrapped black and white twine around the grey panel. I added foam tape and adhered it to my white card base. To finish the card, I added a black frame around the shaker part.


These little bags were so fun to make! I used the MFT Boo Bag die and some patterned paper I had in my stash for them. To make the tags, I used a lawn fawn tag die and grey cardstock. I blended Pumice Stone distress ink over the spider web stencil on the tags. Then, I popped up the little monsters that I had colored and fussy cut on foam tape. I used the other sentiment from the set for one of the tags and die cut the letters for the other two. Then, I tied black and white twine to the tags and attached them to the back using cute little stationary clips.

Copics:

Yellow Monster: Y00, Y11, Y15, V01, V04, BG11, BG13

Purple Monster: V01, V04, V05, R00, R30, BG11, BG13, BG23, YG01, YG23

Blue Monster: BG10, BG11, BG13, BG23, YR31, YR61, YR65, YR68

Green Monster: YG01, YG23, V01

I hope you like my project for today! Do you remember what your first Unity Stamp set was?
 
Thank you for stopping by and don't forget to leave a comment!
Kimberly

Friday, September 17, 2021

You are the Unicorn of Friends {Brutus Monroe}

 Hello crafty friends! I am back to share a couple more cards using the Brutus Monroe Unique Unicorn Inspiration Box! I love the pre printed toner sheets in the kit. You can leave them black and white and go simple, you can foil them, or you can get as fancy as you want! Today, I went all out on two of them and love the results! 


 For my first card, I ink blended Tumbled Glass distress oxide over the cloud stencil from the clouds and grass stencil set that I had purchased separately. Then, I foiled it with Gina K marigold foil. I used my Sizzix Rainbow Magic die and paper scraps I had in my stash to make the clouds and rainbow. Next, I stamped and die cut the Unicorn from the Unique Unicorn stamp set in the kit. Then, I colored it with Copic markers. I trimmed a sentiment from the conversation clippings in the kit. Next, I assembled the card. I adhered the toner panel to a piece of the beautiful glitter paper in the kit. Then, I glued the rainbow and unicorn to the panel. To finish, I added foam tape to one of the clouds and the sentiment and attached them to the card. 


My second card features some ink smooshing. I started out smooshing, Picked Raspberry distress ink and heat set it so the colors wouldn't turn to mud. I repeated the process with: Peacock Feathers, Mustard Seed, Twisted Citron, Carved Pumpkin and Wilted Violet distress ink. It is very important to heat set between each color. 


After I finished smooshing the ink and everything was completely dry, I foiled the panel with Gina K Marigold foil. Next, I stamped and die cut three stars and the pegasus using the Unique Unicorn stamp and matching die set in the kit. Then, I colored them in with Copic markers. I cut the sentiment from the conversation clippings in the kit and started to assemble the card. 

I adhered the toner panel to a piece of the glitter cardstock from the kit. Then, I added two stars and the sentiment. To finish the card, I added foam tape to the back of the pegasus and one star to pop them up for dimension. 


I love how fun and colorful this is! Thank you so much for stoping by and get the Unique Unicorn Inspiration box before they are all gone!!!

Copics used: 

Stars: Y00, Y11, YR31

Unicorn and Pegasus: R20, Y11, G20, B0000, V01, W00, E40 and T3

Unicorn/Pegasus Horn: Y11., Y15, YR23 Cheeks: R30

Kimberly

Wednesday, September 15, 2021

Falling for You Using Emboss Resist Technique {Maker Forte}

 Hello! I am going to share how I used an old technique called Emboss Resist to make the background of this card!

I love the emboss resist technique because you can make such fun backgrounds with it. For this card, I stamped the newly released Eileen Hull Vintage Damask background stamp on white cardstock using Clear Color Hive embossing ink and embossed it with clear embossing powder. This is a time when using the Perfect First Impression tool is really important. Background stamps can be tricky to get complete coverage and it is hard to see with clear embossing ink. This came out perfect the first time I inked it and stamped it using that tool. 

This embossed background looks so pretty just by itself!

Next. I ink blended Yellowstone Color Hive ink over the image.

Then, I blended English Mustard Color Hive ink around the outside border of the card.

Once I was happy with the ink blending, I took a cloth and whipped the ink off of the embossed image. 

This is definitely one of my favorite background stamps right now! It is so pretty! Next, I glued a piece of Yellowstone cardstock to a card base made with Telephone Box cardstock. Then, I added this background panel to the card base using foam tape and set this to the side. 
I made the leaves by ink smooshing English mustardTelephone Box, and Grand CanyonColor Hive Inks on watercolor paper.

I heat set it between each color to make sure the inks didn’t mush together and turn muddy. Then, I stamped the leaf from Falling For You stamp set using clear Embossing Color Hive ink over the ink smooshed cardstock a few times. I embossed it with gold embossing powder and fussy cut the leaves.

Then, I adhered two of the leaves directly to the embossed background and added foam tape to the middle leaf. To finish the card, I stamped the sentiment on a strip of white cardstock and added color by ink blending over it with the ink that was left in my blender brushes so it wouldn’t be too dark. 

Thank you for stopping by! I hope you try this emboss resist technique!

Kimberly

Friday, September 10, 2021

Falling For You {Maker Forte}

 Happy Friday crafty friends! Today I have this quick and easy card using the Jess Francisco/Maker Forte collaboration  “Falling For You” stamp set and Blustery Day stencil.

** Affiliate links are used throughout this post at no additional cost to you. This allows me to keep bringing you content. Thank you all for your support! ** 

To begin this card, I ink blended Telephone Box Color Hive ink through the Blustery Day stencil on watercolor paper. Next, I flipped it over and blended English Mustard Color Hive ink through the stencil. 

Then, I spritzed the stencil with some water and, using a paintbrush, flicked the ink on the stenciled panel for a splattered look. 

I cut the panel down to 4″ x 5 1/4″ and put it to the side. Next, I stamped the images from the Falling For You stamp set on white cardstock using Eclipse Black Color Hive ink. I heat set the ink to make sure it was dry. Then, to add color to the images, I blended them with the ink that was left on my brushes so it would be very light. The colors used were Grand Canyon and English Mustard.

To finish the images, I blended the same colors over one of the Camouflage stencils and over the 3D Background Stencil.

Then, I fussy cut the leaves and pumpkin. I stamped the sentiment on a strip of white and lightly blended English Mustard Color Hive ink on it. Then, I layered it on a strip of Eclipse Black cardstock. I cut an oval from gold cardstock I had in my stash. Before I assembled the card, I added Copic YG05 to the stem of the pumpkin. I adhered all of the pieces to the stenciled panel and added foam to the pumpkin for dimension. Then, I adhered it to the card base I cut from Telephone Box cardstock. To finish the card, I added some Solar Flair Crown Jewel Gems

I just love the ease of adding color to the images by ink blending rather than coloring it in. The stencil almost gives it the look of stamping on background paper and fussy cutting it out.

Thank you for stopping by!

Kimberly

Channeling My Inner Lisa Frank! {Brutus Monroe}

Happy Friday! I am so excited to share this card I made using the new Brutus Monroe Subscription Box "Unique Unicorn"!  Everything about this card brings me back to my school days when Lisa Frank stickers were the "in" thing! 

** Affiliate links are used throughout this post at no additional cost to you. This allows me to keep bringing you content. Thank you all for your support! ** 


I began by ink blending the following Distress Oxide inks: Picked Raspberry, Carved Pumpkin, Mustard Seed, Twisted Citron, Mermaid Lagoon, and Seedless Preserves


Next, I blended the same inks over themselves through the Brutus Monroe Mixed Media: rainbow stencil that I had in my stash.


Then, I watered down a little gold acrylic paint and flicked it on the ink blended panel.


Next, I stamped out and die cut a bunch of images from the beautiful stamp set and matching dies from the inspiration box. I chose to use a unicorn, butterfly and the rainbow images. I colored them using Copic markers. 


The Copic Markers that I used are:
Unicorn: T0, T3, T7, R20, R30, W00, E40, Y00, Y11, Y15, YR23
Unicorn Mane, Tail, and Rainbow: RV21, RV25, YR65, YR68, Y32, Y35, YG03, YG05, BG01, BG45, V01, V05

Then, I began assembling my card. I adhered the rainbow panel with foam tape to a card base using teal cardstock for the Inspiration Box. I added a frame from my stash, followed by the rainbow and butterfly. I added foam tape to the unicorn and adhered it to the card. I added a conversation clipping from the inspiration box and finished it off with some sequins. 

I love how colorful this card is. Do you ever make cards that remind you of your childhood? 


Thank you for stopping by!
Kimberly