** Affiliate links are used throughout this post at no additional cost to you. This allows me to kee

** Affiliate links are used throughout my blog posts and on the right side of my blog at no additional cost to you. This allows me to keep bringing you content. Thank you all for your support! **

Tuesday, June 29, 2021

Hop along Day 2 with The Rabbit Hole Designs- Hoppy Holidays!

Day 2 of the Christmas in July release from The Rabbit Hole Designs!!!! I made this card using the new Hoppy Holidays stamp set, illustrated by Tatsiana Zayats, and an older stencil Splish Splash.

**Affiliate links are used throughout this post at no additional cost to you. This allows me to keep bringing you content. Thank you all for your support! ** 

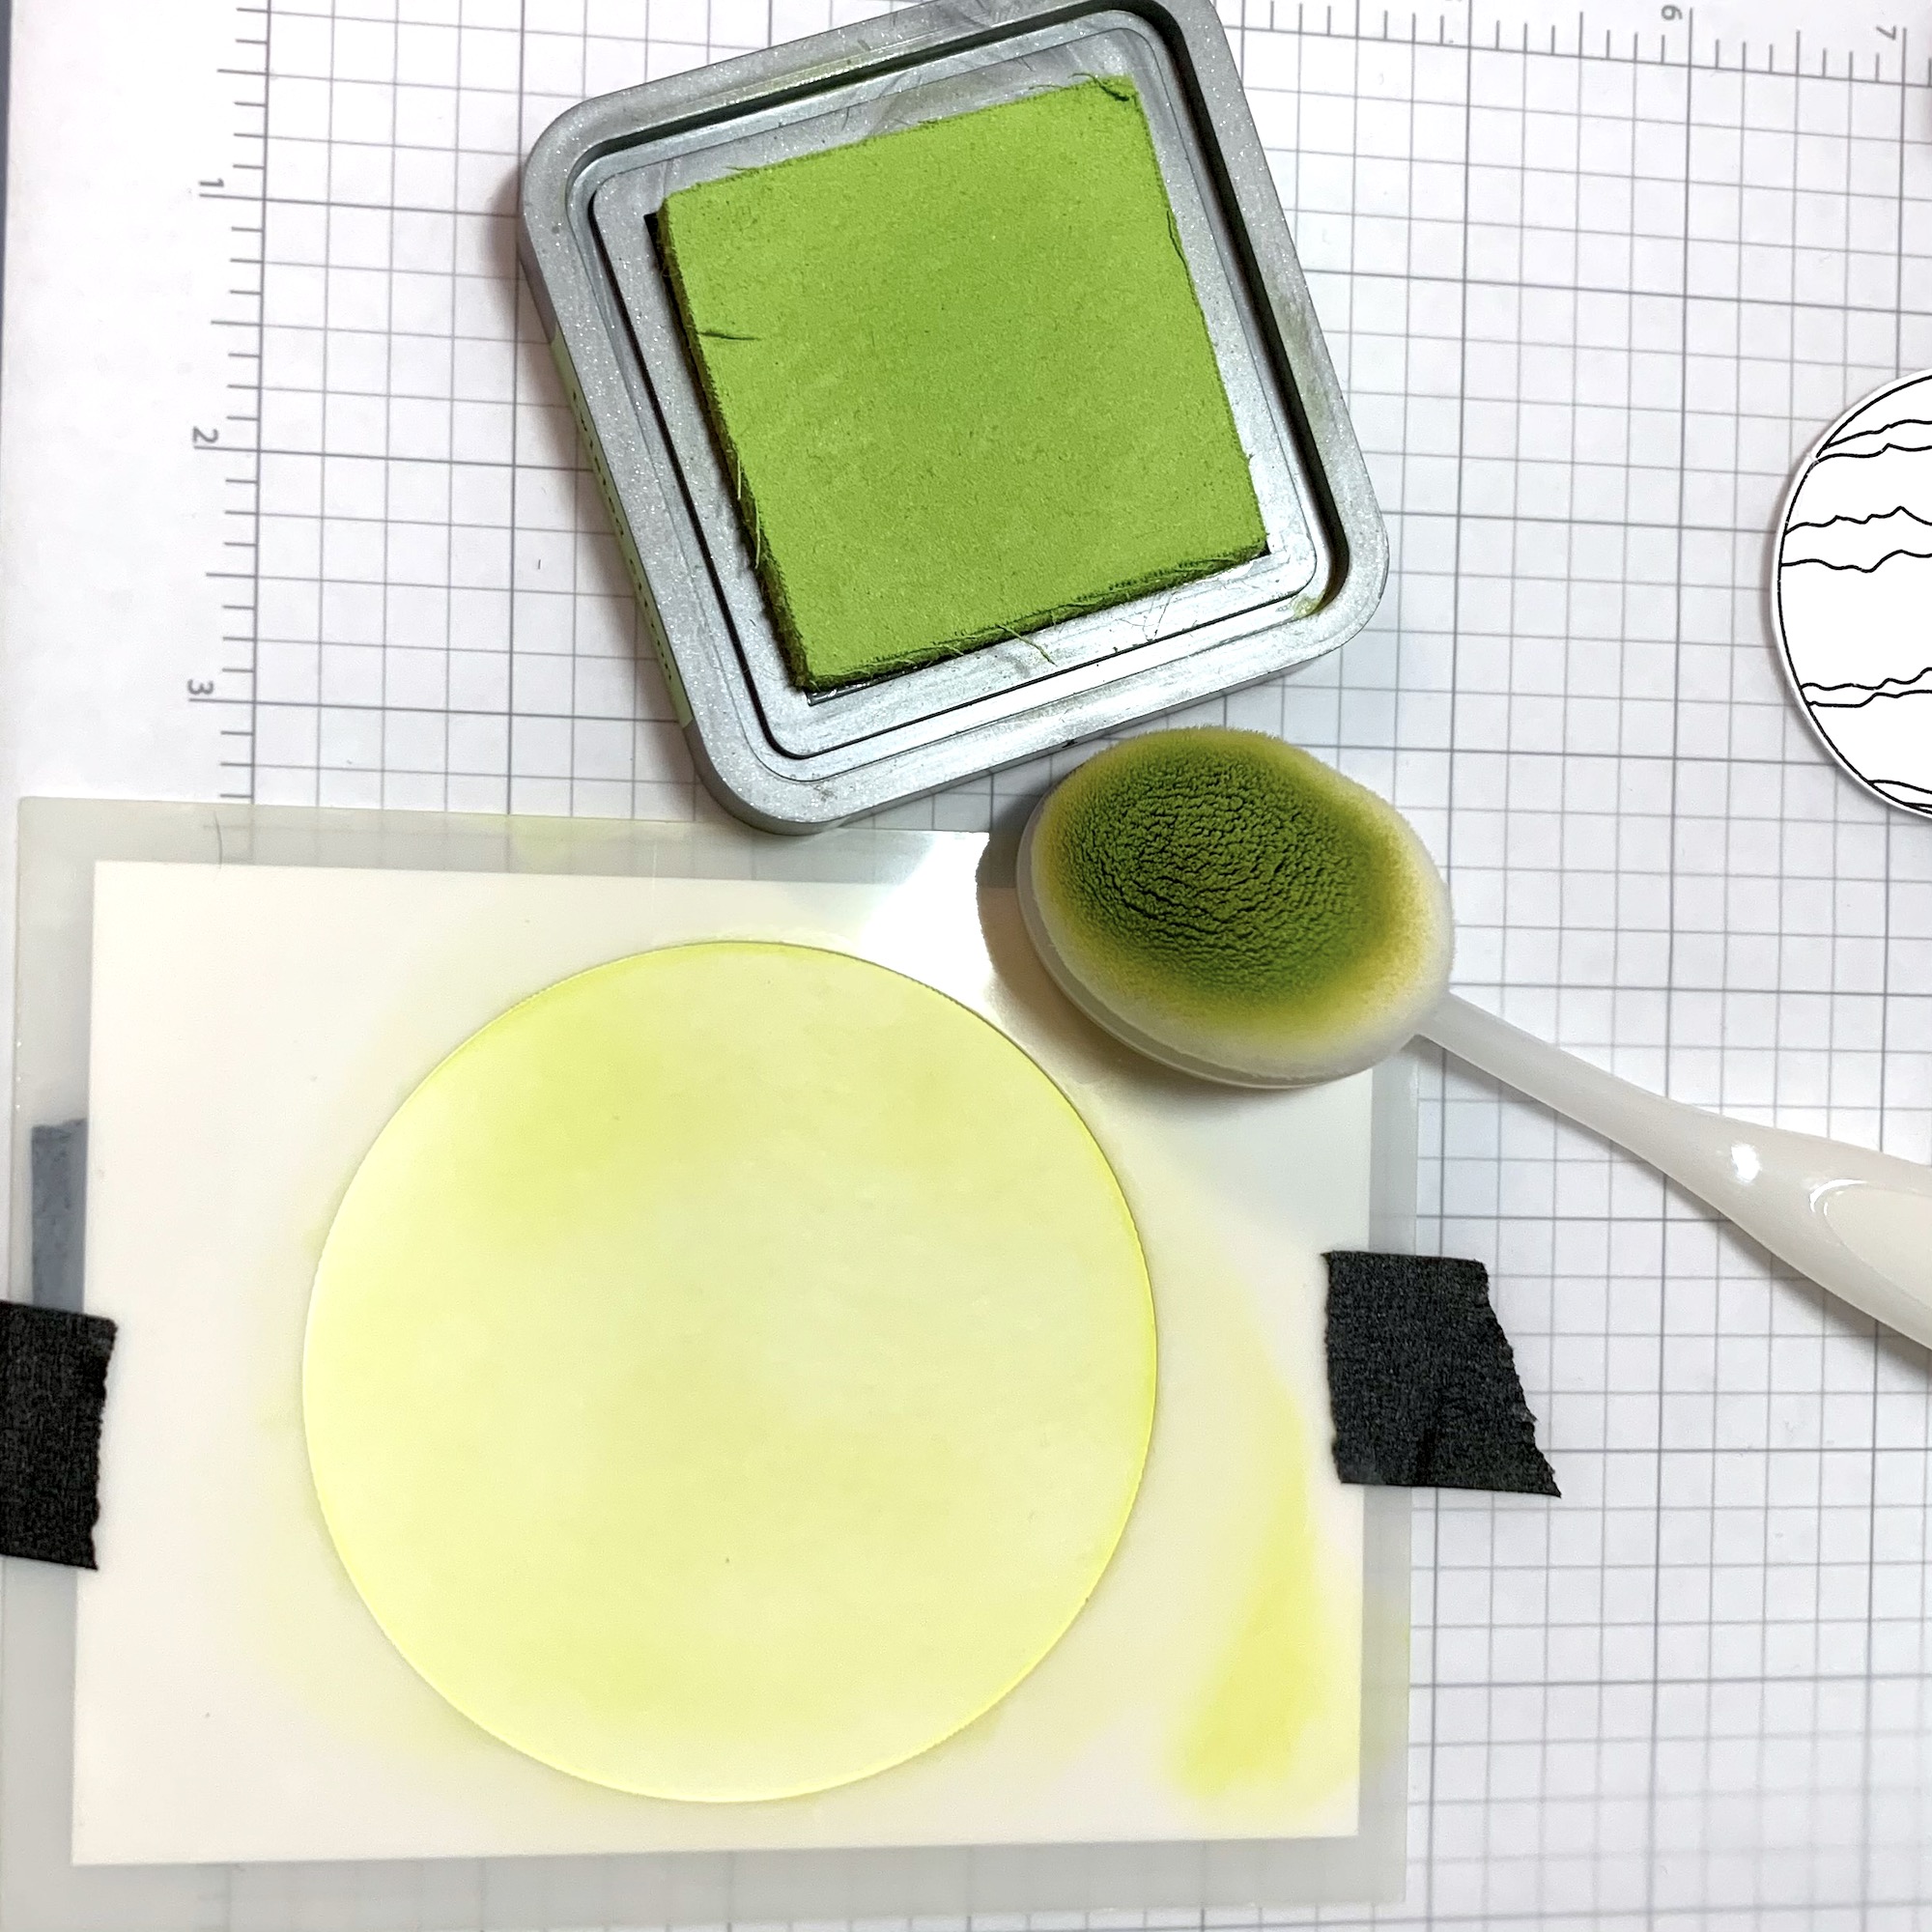
This little bunny is so adorable!!! I colored in this image from the Hoppy Holidays stamp set with Copics and cut it out. To make the background, I ink smooshed Mowed Grass and Twisted Citron Distress Oxide inks on watercolor paper. Then, I took the Splish Splash stencil and spritzed water through it. Using a paper towel, I lifted off some ink through the stencil. Once the water dried, I lined the stencil up with the lifted ink and spread texture paste through it so I would have a little texture and the glossy finish over the stenciled image. 

Next, I popped the stenciled panel up on a red card base using foam tape. I attached the adorable bunny image using foam tape also. To finish the card, I colored and cut out the holly image and stamped the sentiment on a strip of white cardstock. 

Thank you for stopping by! Be sure to check out some more awesome inspiration by hopping along!


GIVEAWAYS:

To celebrate the next three days of release,  The Rabbit Hole Designs is giving away two savings vouchers; one to a lucky Instagram Follower and one to a lucky Fan Page follower.  Winner will be chosen at random from the comments left on the INSTAGRAM post, and tagging friends, and also from commenting on the Fan Page post.  So make sure to head on over to INSTAGRAM and look for the giveaway post  @therabbitholedesignsllc and look for the post  at The Rabbit Hole Designs Fan Page by 11:59 p.m. PST 07-01-2021.  Winner will be announced on The Rabbit Hole Designs blog 07-02-2021.


Monday, June 28, 2021

Welcome to the Christmas in July release- The Rabbit Hole Designs!!!!!

I have a super cute Christmas release from The Rabbit Hole Designs to share with you today!!! I made this card using the new Christmoose-Moosemas stamp set, illustrated by Tatsiana Zayats, and an old favorite of mine Back Alley Stencil

**Affiliate links are used throughout this post at no additional cost to you. This allows me to keep bringing you content. Thank you all for your support! ** 

I just adore this stamp set and enjoyed making my first Christmas card for the year! First, I stamped the image of the moose from the Christmoose-Moosemas set twice and cut them out. (There is a coordinating Christmoose-Moosemas die). I removed the antlers from one so I could have the couple on the card together. Then I colored them with Copic markers. Next, I blended Fired Brick Distress Oxide through the Back Alley stencil on a panel of white cardstock that I had die cut. I layered the white cardstock on a green card base, and added foam tape to pop up the moose images. Then, I stamped the sentiment on a strip of white cardstock. Using a ruler, I added some straight black lines to the top and bottom of the sentiment and I lightly blended some ink trough the Back Alley stencil over the sentiment. I cut a red strip of cardstock and snipped flags on each side for the sentiment to sit on. Lastly, I added foam tape to pop up the sentiment. What a great time to get started on your Christmas cards if you haven't already! 

Please hop along with my amazing teammates and have a chance to win some awesome prizes!!

GIVEAWAYS:

To celebrate the next three days of release, The Rabbit Hole Designs is giving away two savings vouchers; one to a lucky Instagram Follower and one to a lucky Fan Page follower. Winner will be chosen at random from the comments left on the INSTAGRAM post, and tagging friends, and also from commenting on the Fan Page post. So make sure to head on over to INSTAGRAM and look for the giveaway post @therabbitholedesignsllc and look for the post at The Rabbit Hole Designs Fan Page by 11:59 p.m. PST 07-01-2021. Winner will be announced on The Rabbit Hole Designs blog 07-02-2021.

Saturday, June 26, 2021

Meerkat Alibi with The Rabbit Hole Designs!

Hello crafty friends! I have a fun card using The Rabbit Hole Designs Caffeinated Meerkat stamp set and coordinating die. I had so much fun making this card.

**Affiliate links are used throughout this post at no additional cost to you. This allows me to keep bringing you content. Thank you all for your support! ** 

I started out blending Speckled Egg Distress Oxide over the Clouds in my Coffee Stencil on white cardstock. Then, I wanted some texture so I added some texture paste over the full clouds in the center of the stencil on the ink blended cloud background. I put that to the side to let the paste dry.
 
Next, I decided I wanted to make a bush/tree background using the Clouds in my Coffee Stencil, so I blended Gathered Twigs distress oxide ink and alternated it with Rustic Wilderness distress oxide over another piece of white cardstock. I cut the center out with an oval die and added foam tape to the back to pop it up on the blue cloud background.
 
Next, I colored in my Caffeinated Meerkat with Copic Markers, cut it out and added foam tape to adhere it to the card. To finish the card, I stamped two sentiments from the Sassy Sentiments stamp set on strips of brown cardstock with embossing ink and heat embossed them with white embossing powder. I attached them to the card and adhered the card front to a brown cardstock card base.
 
I hope I was able to inspire you to make something crafty today! Thank you so much for stopping by!
Kimberly

Friday, June 25, 2021

Best Moments are in Flip Flops with Maker Forte!

 Hello! I am excited to share a super easy shaker card using a few supplies from Maker Forte! I am a huge beach lover, and this card is perfect for anyone that loves the beach. I used the Seaside Sentiments stamp set and the Hedgehog Hollow Sea Shells square stencil for this card.

**Affiliate links are used throughout this post at no additional cost to you. This allows me to keep bringing you content. Thank you all for your support! ** 


I started out by blending Tumbled Glass distress oxide over the shells of the Sea Shells square stencil. Then, I blended Milled Lavender over a couple
shells and Spun Sugar over a couple. Next, I blended Speckled Egg over the
rest.


The colors are just beautiful together! I normally do not make square cards, but I loved how this whole panel looked. I could not decide what to cut out of it to make an A2 sized card so I cut the panel down to a 5 1/2" square. Next, I cut the center out with a square die so I could make a shaker card.


For the shaker part, I glued the center on a piece of tan cardstock and stamped a sentiment from the Seaside Sentiment stamp set using Eclipse black ink. Then I added foam tape to the outside of the center square.


To finish off the card, I glued a piece acetate to the underside of the stenciled frame. Next, I added foam tape to the back around the outside edge so it did not interfere with the foam tape on the bottom panel. Then I added some sand to the center of the shaker, and removed all of the paper from the foam tape. Being very careful to line it up properly, I placed the frame over the bottom panel.


Finally, I added a white scalloped frame and a starfish I had in my stash to the front. I love the colors so much, I may frame it instead of sending it as a card! The Sea Shells square stencil makes for a gorgeous background!!!


Thank you for stopping by! I hope I was able to inspire you to make something crafty today!
Kimberly

Friday, June 18, 2021

Always Make Waves- Brutus Monroe

 Hello and happy Friday! I am so excited to share a card I made using this month's Brutus Monroe Subscription Box, Mermaid Kisses! If you know anything about me, you know I LOVE anything that is nautical or beach related. Mermaids fall into that category in a major way! 

**Affiliate links are used throughout this post at no additional cost to you. This allows me to keep bringing you content. Thank you all for your support! **

I did purchase Brutus Monroe Sand Paste and the Brutus Monroe Tangled Waves Stencil separately because I knew I would use it and I am so glad I did! I have a quick video of my process making this card. 

[What is included in the box?]
June 2021 Mermaid Kisses Subscription Box.


To start, I blended Peacock Feathers, Milled Lavender, and Wilted Violet distress oxides through the Tangled Waves stencil. Then, I die cut a circle out of the center. Next, I took a scrap piece of acetate and cut the bottom to resemble sand so I could apply the sand paste to the blended background and have shape to it. I put this panel to the side to dry. 

While the sand paste dried, I stamped many images from the Mermaid Kisses stamp set on white cardstock with Raven ink. I like to stamp a bunch and color them so I can play with them to see which images I want to use when I build my scene. Once I colored them, I die cut the images using the coordinating Mermaid Kisses die set that is included in the subscription box

Next, I cut a 4 1/4" x 5 1/2" piece of Heather cardstock included in the box and attached it to one of the white card bases also included in the box. Then, I placed the stenciled panel on the Heather cardstock so I could line up and glue the center circle I had cut out earlier in the correct place. I added foam tape to the outer stenciled panel, but did not attach it yet. I started placing all of my images in place and glued them down to where I wanted them. I added three of the clear baubles included in the box and then attached this panel to the card base. To finish the card, I stamped the sentiment on white cardstock and layered it on a strip of Heather cardstock. I added foam tape and attached into the card. 


{Copic Markers}
Hair:E30, E23, E27 Skin: E000, E00, E11, R20
Fins:V000, V05, BG11, BG13, BG34 
Trunk: E35, E37, E29, YG28 Gold: Y11, Y15, Y26
Coral: R32, R35, R39 Light Coral: R30, R32
Greens: G12, G14, G03


I hope I was able to inspire you to make something crafty today! Thank you so much for stopping by! 

Kimberly

Monday, June 14, 2021

Butterfly Kiss with clouds in the grass!

Hello friends! I have a cute card to share today with the newly released Butterfly Kiss stamp set and coordinating Butterfly Kiss die from The Rabbit Hole Designs. I paired it with the clouds in my coffee stencil, using it not only for the sky, but my grass as well!

**Affiliate links are used throughout this post at no additional cost to you. This allows me to keep bringing you content. Thank you all for your support! **

I absolutely love this Butterfly Kiss stamp set. I stamped all of the images, colored, and die cut them using the Butterfly Kiss dies. To make the background, I covered the bottom of my white panel with an oval to block off where I wanted my grass mound to go. Then, using the Clouds in My Coffee stencil, I blended Speckled Egg distress oxide to build my sky.


When I finished building my clouds, I stamped the sentiment directly to the panel. Next, I used an oval frame to blend Mowed Lawn distress ink to make the mound. Then, I used the Clouds in My Coffee stencil to add shape to my grass mound.


Next, I adhered the images that I die cut to the scene I had built. To finish my card, I glued that panel to a green card base. 


Thank you so much for stopping by! 
Kimberly

Have a Relaxing Day! Maker Forte

 Hello there! Kimberly here to share with you how I made this card using Seaside Silhouettes and Seaside Sentiments from Maker forte.

**Affiliate links are used throughout this post at no additional cost to you. This allows me to keep bringing you content. Thank you all for your support! **


I started out blending a few Cathrine Pooler inks: Tiara, Tiki Torch, Aquatini and Flirty Fuchia. Then, I spritzer it with water for a water drop look. Next I stamped the palm tree image from the Seaside Silhouettes Stamp set on the blended background with Eclipse black ink. Next, I blended Gathered Twigs Distress Oxide ink through the 3D Stencil making it darker in some areas and keeping some lighter. I die cut a circle out of this panel and lined the blended background behind it. Then, I added my Before the storm Crown Jewel Gems using the Rainbow craft picker. Next, I added a brown circle frame I had cut earlier using my rainbow tweezer. I prepared the Yellowstone cardstock card base by reinforcing the crease of the fold with the bone folder. I stamped the sentiment, cut it down and cut a strip of Yellowstone cardstock to layer underneath it. Then, I glued my stenciled panel to the stamped panel. I added flags to the ends of my sentiment strip and the Yellowstone layer. To finish the card, I added foam tape to pop up the panel off the card base. Then, I added foam to the sentiment and attached that to the card.


I have a video to share showing the process of making this card. I hope I have inspired you to make something crafty today and thank you for stopping by!

Kimberly

Friday, June 11, 2021

You Are One Cool Duck!! {Brutus Monroe}

 Hello crafty friends! I have a couple of real cute cards to share today using the Splish Splash Stamp Set along with a few other products from the Brutus Monroe  Splish Splash subscription box

**Affiliate links are used throughout this post at no additional cost to you. This allows me to keep bringing you content. Thank you all for your support! **

I really love this subscription box. Some of the products can be purchased separately but, the stamps and other products included in the kit are really worth the price! My first card to share is this adorable floral duck card. To make the ducks line up in a row, I stamped the center duck on white cardstock. Then, I stamped a mask for the duck (the pink duck) and cut it out. I moved the mask over the duck that I was going to be partially stamping on each time.


Using the mask allows the center duck to be fully visible. Once I finished stamping the ducks. I drew in quick and easy flowers on the center duck using Copic markers RV17 and YG25. Then, I used a white gel pen for the centers. Next, I colored in all of the Ducks using: Y000, Y11, Y21 and the duck bills were colored using: YR00, YR12, YR15, YR18.


I wanted to use the embossing powder that came in the Splish Splash Box. Before I did that, I added water using B32, B34 Copics. I cut waves out a scrap piece of paper with so I could smoosh embossing ink over the blue water that I added. 


Next, I smooshed the embossing ink over the bottom of the card and heat embossed the Sparkling Suds embossing powder from the Splish Splash box. Then I covered the ducks with masks and blended Tumbled Glass Distress ink over the top of the ducks. I just love how the Sparkling Suds embossing powder adds texture.


I added foam tape and adhered it to the yellow cardstock from the Splish Splash box. To finish the card, I added a sentiment from the sentiment strips and a few Splish Splash sequins from the box. 


My second card was super easy peasy! The duck background is a toner sheet from the Splish Splash box. I ran it through my Minc machine with Enchanted Rose Deco Foil. Then I trimmed the panel down with the Pinkfresh Diagonal stitch Rectangle Die. I cut out a white frame and popped it up on foam tape. The sentiments are from sentiment strips included in the Splish Splash box. I stamped the duck and a bow from the Splish Splash Stamp set and cut them out. I colored the duck with Copic markers: R000, R00, RV02, Y00, Y11 and Y21. I colored the bow with YR00, YR15, YR18. 


To finish the card, I added a few Splish Splash sequins from the box. 


Thank you so much for stoping by! I hope I have inspired you to create something today! Stop by Brutus Monroe for the products I have shared today and many other awesome products in the shop!!!

Kimberly


Wednesday, June 9, 2021

FRUITY SET OF CARDS! {Hedgehog Hollow June Subscription}

Hello crafty friends! I have a cute set of cards to share using the stamps from the June Hedgehog Hollow Subscription Box. I love the fruit theme in this month's box!! These cards were so fun to make. 
 **Affiliate links are used throughout this post at no additional cost to you. This allows me to keep bringing you content. Thank you all for your support! **

For my first card, I used the A2 Circle Spotlight and Spotlight Insert Collection 1 stencils from Maker Forte. I placed the circle spotlight on my 4 x 5 1/4" Ultra White cardstock and blended Twisted Citron distress oxide ink.
 

Next, I used the leaf Spotlight insert and blended Mowed Lawn distress oxide ink.
 

Then, I stamped the fruit and sentiment on Ultra White cardstock. I colored the oranges with Copic Markers, cut them out and glued them to my stenciled panel. Next, I layered the sentiment on a piece of Eclipse Black cardstock and adhered it to my card with foam tape. To finish the card, I layered my panel on a card base using British Racing Green cardstock
 

For my next card, I used the Unbe"leaf"able Stencil. I blended Twisted Citron and Mowed Lawn distress oxide inks over the stencil on Ultra White cardstock
 

Next, I stamped the fruit and sentiment on Ultra White cardstock. Then, I colored them with Copic Markers and cut them out. I layered the sentiment on a piece of Eclipse Black cardstock and arranged the fruit on the ink blended panel. After I adhered the fruit, I added foam tape to the sentiment and adhered that just under the fruit. To finish this card, I layered my panel on a card base using British racing green cardstock
 

For my last card, I used the Dahlia Slimline Stencil. I blended the Twisted Citron and Mowed Lawn distress ink on Ultra White cardstock

 
Next, I stamped the peaches and sentiment on Ultra White cardstock. I colored them with Copic markers and cut them out. Then, I arranged the peaches around the stencil and adhered them. I did pop the middle peach up on foam tape after adhering the sentiment down first. To finish the card, I layered my panel on a card base using Hyde Park cardstock.
 

{Copic Markers} 
Pear: YG01, Y02, YR61, YG03, YG63, YG67 
Peach: YR61, YG03, YG67 
Oranges: Y35, Y38, YR68, YG03, YG63, YG67

I hope I inspired you to make something crafty today! Thank you for stopping by!
 
Kimberly

Friday, June 4, 2021

Take Time to Unwind!

 Hello friends!! I am so excited to be writing my first blog post for Brutus Monroe!!! I have two cards to share using the products from the Splash Splash Subscription Box along with a couple of other products you can find at Brutus Monroe. 

**Affiliate links are used throughout this post at no additional cost to you. This allows me to keep bringing you content. Thank you all for your support! **

I am so in love with this adorable duck!! This box has so much wonderful goodness in it and these cards only feature a few of the products! 

To make this shaker card, I started with the yellow cardstock provided in the Splash Splash box and die cut it using the Diagonal Stitched rectangle die. I blended Kitsch Flamingo distress oxide ink through parts of the brick stencil that was included in the box. I made some areas a little darker than others. Next, to make the frame, I cut the center out with a smaller rectangle die. To make sure I had the inside rectangle centered, I lined the yellow frame up on the card base and glued down the center rectangle while everything was lined up. Then I removed the yellow frame, glued a piece of acetate to the back of it and set it aside to dry. 

To make the scene, I stamped the duck, bathtub, and bubbles from the Splash Splash stamp set using Raven ink. I colored in the images with Copic Markers (colors listed below) and fussy cut them out. There are coordinating Splash Splash dies, but this time I decided I didn't want the white border. Next, I smooshed the bubbles in embossing ink and embossed it with the embossing powder that was included in the Splash Splash Box. I love how the bubbles look with the blue sparkle!  

I arranged the images on the center rectangle and glued them down. Then I lined up my "splash splash" sentiment and stamped it on the panel, using my Misti and Raven ink. I glued some of the Splash Splash sequins, that was included in the box, to the panel. Once everything was dry, I added foam tape around the border of the panel to make the shaker.

I added beads from the Adventures at Sea embellishment set and adhered the frame with the acetate to the top of the foam. To finish this card, I added one of the sentiments from the sentiment strips in the Splash Splash box

My next card is so sweet for a baby card. It is also a pretty quick card to make. 

To begin, I die cut a piece of yellow cardstock that was provided in the Splash Splash Box and adhered it to a white card base. Then, I stamped the duck and a bow with Raven ink on white cardstock and colored them with Copic markers (colors listed below). I cut them out and put them to the side. 

To make the fun pink and yellow back ground, I sprayed some Kitsch Flamingo oxide spray on a piece of Watercolor paper. When I dry my ink sprays, I dry the cardstock from the front and the back. 

It is very important to dry it with a heat gun before adding the next color so they do not mix. In this case, if they mixed, it would make an orange color but if you used two complimentary such as red and green, they would turn brown if you did not dry each color before applying the next. Once I dried the Kitsch Flamingo oxide spray, I sprayed Wild Honey distress stain and dried it with a heat gun.

To finish the background, I blended the Kitsch Flamingo Oxide ink through the brick stencil that is included in the subscription box. Next, I cut this panel down to 3 3/4" x 5", added foam tape and adhered it to the card base that I had prepared earlier. I cut the "welcome baby" sentiment from the sentiment strips included in the box and added foam tape to the back. Then, I glued the bow to the duck and added foam tape to the back of the duck image. I added the sentiment and duck to the card and glued a few of the Splash Splash sequins to the card for some bling.


Copic colors:
Duck: Y00, Y11, Y21 Cheek: R20
Duck Bill: YR00, YR15, YR18
Tub: W00, W0
Water: B0000, B000
Bow: RV11, RV13, RV17

Thank you so much for stopping by! I hope I inspired you to create something fun today!

Kimberly

Wednesday, June 2, 2021

Quick and Easy Butterfly card!

Hello friends! I would like to share with you how to make this quick and easy butterfly card! I used the Butterfly stencil and the Butterfly Kiss stamp set from The Rabbit Hole Designs June release. I love them both so much! 


I started blending distress ink through the butterfly stencil to give it a pastel rainbow look. The colors I used were: wilted violet, picked raspberry, carved pumpkin, mustard seed, twisted citron, and mermaid lagoon. Next, I used glitter paste through the stencil before removing it. Once I removed the stencil, I put the butterfly off to dry while I prepared the background. I blended Speckled egg distress ink over the Clouds in My Coffee Stencil on my white cardstock panel. Then, I stamped the sentiment from Butterfly Kiss on the bottom right corner of the panel. Next, I adhered that panel to the card base. To finish off the card, I fussy cut my butterfly and popped it up on foam tape to adhere it to the card. 

Thank you for stopping by! Have a crafty day!
Kimberly

Tuesday, June 1, 2021

Punny Fruit Slimline Cards! {June Hedgehog Hollow Subscription Box}

 Hello there and happy June! Today I would like to share these easy and cheerful mini slimline cards using the June Hedgehog Hollow subscription box. This box is full of really fun fruit themed products! With just a handful of products from Maker Forte, I was able to create these!

 **Affiliate links are used throughout this post at no additional cost to you. This allows me to keep bringing you content. Thank you all for your support! **

To prepare the cards for the fruit, I cut kraft cardstock for the 3 card bases to 6 1/2" x 7 and scored the 7" side at 3 1/2". Next, I cut 3 Ultra White cardstock panels to 3 1/4" x 6 1/4". Then, I put a piece of Purple Tape on the bottom third of the Ultra White cardstock and blended Gathered Twigs distress oxide ink on all three white panels.

 
I removed the Purple tape and put a new piece over the Gathered Twigs ink making sure it is lined up right on the brown ink line. Then I blended Tumbled Glass distress oxide ink on the panels. You do not want a gap of white between the blue and brown, so lining up the tape is very important. Next, I took a piece of Flower Power patterned paper, which can be foiled, and ran it through the Minc with Lily Pad Deco Foil
 

Next, I stamped my fruit. I stamped two pears on the foiled cardstock. I stamped three raspberries, two bananas, and two pear tops on white cardstock. then, I colored the fruit and pear tops with Copic markers, then fussy cut them out. Next, I used the Deco Foil Transfer Gel pen to color in my raspberry tops and ran the raspberries through the Minc with Lily Pad deco foil
 

Next, I glued the tops that I colored and cut on my foiled pears.
 

Once all the fruit were done, I glued them down on the brown and blue ink panels. I stamped out the sentiments, cut them down and layered them on a piece of Eclipse Black cardstock. Next, I popped the sentiments up on foam tape and added them to the card fronts. Thank you for stopping by!